art

Rethink Color, Composition and Corners with YUPO Round

With YUPO Round artists can reshape, rethink, recompose and reimagine everything and create anew. It’s a revolution that cannot be cornered. YUPO opened a door of creativity with YUPO Round, taking that slick, beloved tree-free medium and literally reshaping it.

Learn more about how artist, Courtney Patterson, uses YUPO Rounds for her artwork.

What do you find appealing about the Round shape?
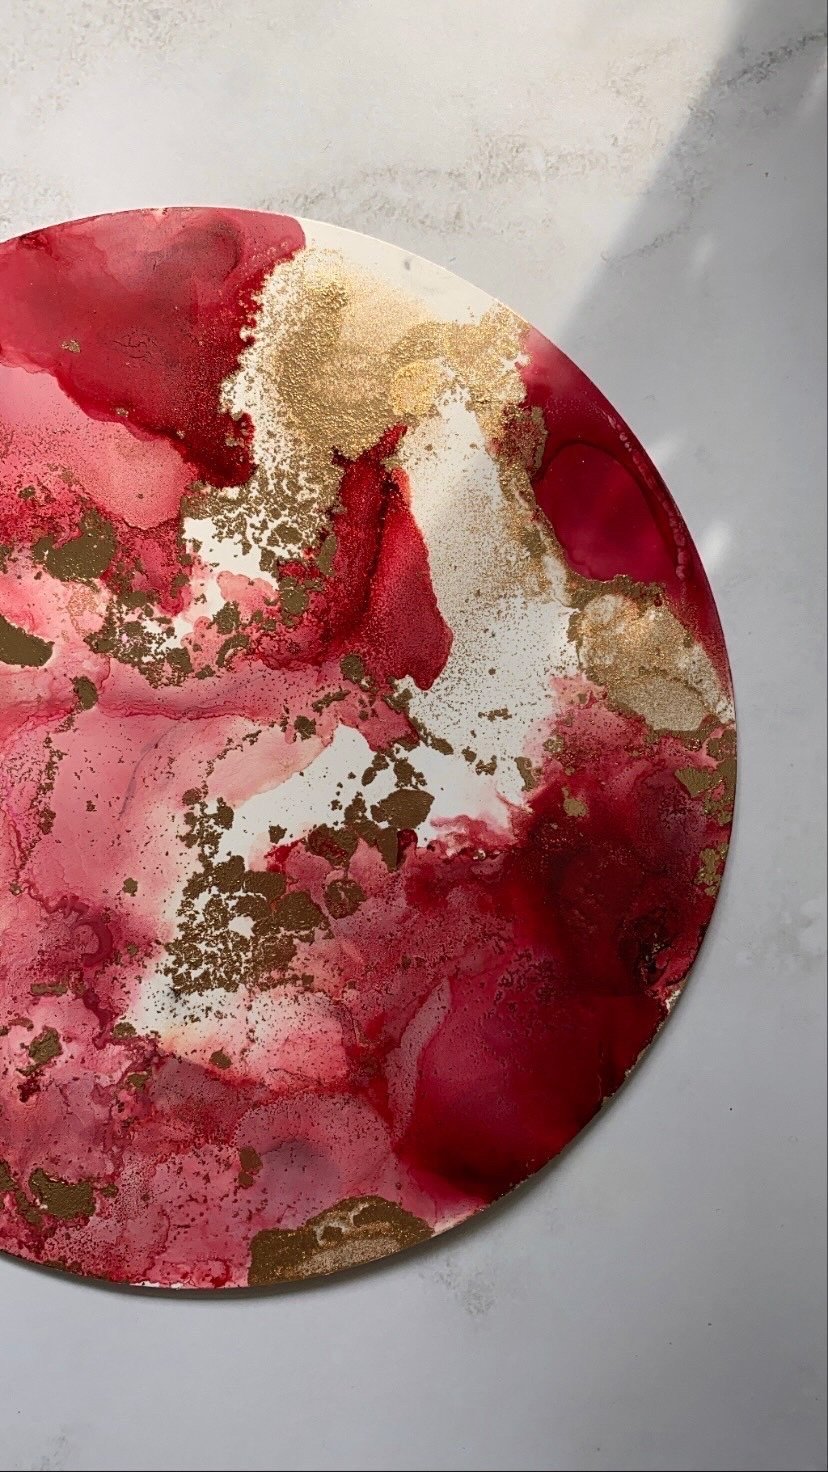
I love the shape of a Yupo Round. Circles are a soft shape and the roundness aspect often adds warmth and interest to a work of art. Circles are also omnipresent in the natural world and I try to include a sense of nature in every piece. The natural world is where I find most of my inspiration.

Does the shape affect the way you work on YUPO?
It absolutely does! I base the direction of the artwork on both the size and the shape of the paper. I really enjoy adding an accent tone to most of my work with alcohol ink (usually a metallic - silver, brass, rose gold, or gold). Depending on the shape and size of the paper, I will either increase or decrease the amount of accent tone I use.

How do you display a finished piece on YUPO Rounds? Do you mount the piece? Do you seal and protect your finished piece?

After the ink has dried on the YUPO Rounds, I use a finisher to set the piece. My varnish of choice is Lascaux 2070 Acrylic Fixative Spray. Often, the alcohol ink will dry with a high gloss and pigment finish, so for me, it is crucial that the varnish is non-yellowing and clear. I always want the natural pigments of the ink to stay intact and for the piece be as vibrant as possible. I let the artwork sit for a few hours before starting the mounting process, I like to mount the YUPO Rounds on cotton board. I then get the board and the spray adhesive beside me, along with some liquid glue. Once I have everything ready to go, I get started by flipping the YUPO Round over and spraying the back of the paper with the adhesive.

I then flip the paper so that it's upwards and adhere it to the center of the cotton board. I carefully press down with my hands and ensure every part of the paper has adhered correctly. In the rare case that it hasn’t, I keep liquid glue (Lineco Neutral pH Adhesive) beside me so more adhesive can be added to the corners of the round if needed. Once the piece has been finished and adhered, I have a rough idea of how it will look framed. Framing is a whole other process, I think it’s important to find a style and tone that best compliments the piece. There are thousands out there, so it’s always enjoyable hunting down the right one. Sometimes a simple moulding suits the artwork best and other times a frame with a little more character compliments the art just right.

 What your favorite media to use on YUPO?
My favorite media to use on Yupo paper is definitely alcohol ink. For the primary colors I use on YUPO Rounds, I enjoy using COPIC ink refills in the 12ml bottles. I drop them onto the YUPO Rounds and use a heat gun to drive the flow and direction of the piece. COPIC carries a variety of beautiful colors and shades. For the metallic accent tones, I usually use Jacquard Piñata Alcohol Ink.

Any struggles you come across with YUPO / any advice for other artists?

There are not too many struggles when it comes to YUPO. Alcohol ink tends to dry quite quickly on non-porous surfaces, so sometimes going back and fixing what we might see as mistakes can be quite a challenge. Although, I often think what we initially see as mistakes can be the most unique or beautiful part of a piece, it can be best to avoid redoing anything and just see where it takes you! It is a good way of pushing you to be okay with being imperfect when it comes to creating. My advice is even if you do not like how it’s turning out at the beginning or midway through, just keep going and you might surprise yourself!

YUPO Medium Round is available in 74lb/197gsm, in both 8" and 12" diameter.

Amanda Heyn creates a phenomenal list of 50 simple ideas to make your art program stand out and stick around for the Art of Education

1. Ask your administrator to do a project alongside your students for a class period.
2. Create a mini gallery in the staff bathroom.
3. Ask the local grocery store to donate bags. Have students create art on the bags, then give them back to the grocery store to use.
4. Have everyone in the school participate in 15 minutes of silent doodling once a month on Friday afternoons.
5. Interview a student about his or her work and post it on your blog.
6. Highlight a “Student Artist of the Week” next to your classroom door.
7. Enter student work in a local or national art contest. Ask your community members to vote.
8. Add a sign to your hallway displays explaining any cross-curricular connections in the work.
9. Send an email to your staff highlighting a few pieces of student work each month.
10. Have students decorate gift wrap to use for community outreach programs during the holidays.
11. Hold an “Art-a-Thon” to raise money for a local charity.
12. Use QR Codes to create an interactive display for people visiting your school.
13. Keep bulletin boards and display cases full of interesting work.
14. Hold an art show.
15. Ask if you can hang art work in your District Office.
16. Ask if you can hang art work at local businesses or in government buildings.
17. Make a positive phone call home.
18. Participate in Back to School Night or Open House.
19. Volunteer to face paint at the school carnival.
20. Lead students in creating permanent (or temporary!) large-scale artwork around your school.
21. Complete a legacy project.
22. If your town has a gallery night, open your school and show off some student work.
23. Create an online gallery.
24. Use art as a fundraiser for your school. Share a portion of the proceeds with other teachers.
25. Have students create art for the school play.
26. Have students create art to hang at school concerts.
27. Collaborate with other teachers on some cross-curricular projects.
28. Create a monthly or quarterly newsletter for families.
29. Create a classroom Facebook, Twitter or Instagram account that parents can follow.
30. Have a sign outside of your door that indicates big concepts being taught in the art room. Change it up weekly or monthly.
31. As part of a reflection at the end of a grading period, have students write what they have learned in art class. Compile the results and share them with your staff.
32. Create a promotional video for your class.
33. During spirit week, have a “Wear Your Favorite Color Day.”
34. Take students on a field trip. Ask parents and administrators to come along.
35. Have students write one new thing they learned on the back of a project to share with someone at home.
36. Create a list of guiding questions for parents and students to use when discussing artwork.
37. Ask about holding student-led conferences in the art room.
38. Make it easy for people to find your classroom website or blog.
39. Create signs to hang outside of classroom doors during conferences toremind parents to come and see you.
40. Ask your librarian to pull books for you.
41. Announce new hallway displays, upcoming art shows and art events on the loudspeaker.
42. Do a lesson with sidewalk chalk to beautify school grounds.
43. Make stepping stones for a school garden.
44. Hold a contest for students to design school t-shirts. Make them available for purchase.
45. Have your students write and illustrate a collaborative book. Give the library and each classroom a copy.
46. Make murals to brighten drab hallways.
47. Invite members of the school board to come spend a day in your room.
48. Send a piece of art through inter-office mail.
49. Create an art scavenger hunt throughout your school. Make clues available to classroom teachers.
50. Ask to put a piece of student art in a prominent place in the school office.